Setting a digital clock can seem daunting, but understanding the process of “how to set a digital clock with 3 buttons” makes it straightforward. This guide simplifies the task, providing clear, step-by-step instructions to ensure your clock displays the correct time. Whether you’ve just purchased a new watch or need to adjust for daylight saving time, mastering the functions of the three buttons—Set, Mode, and Adjust—will save you time and frustration. Follow along to learn how to efficiently set the hour, minutes, and optional features like the date and day, ensuring your digital clock is accurate and reliable.
Understanding the Buttons

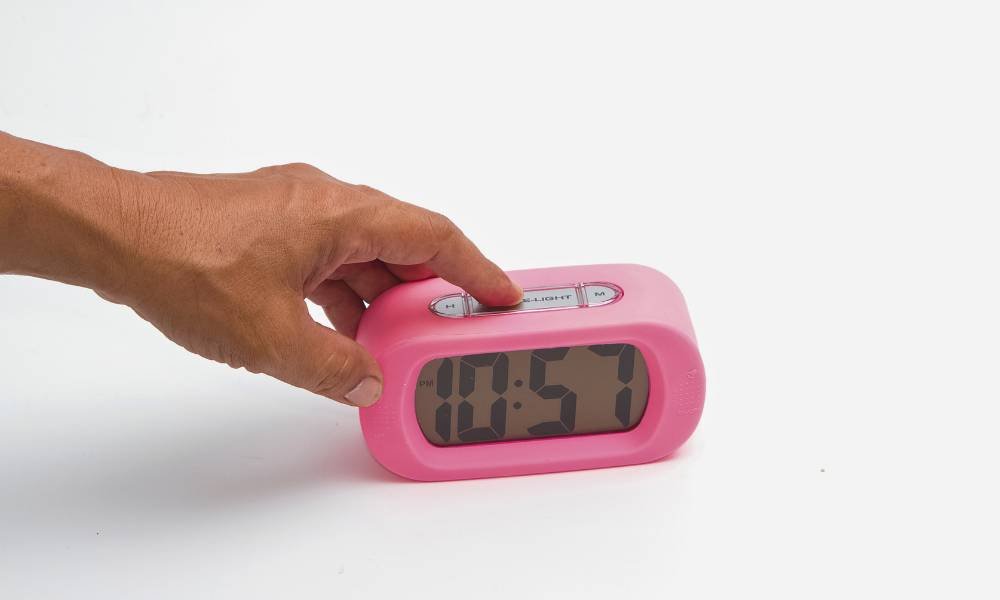
Understanding the buttons on your digital clock is the first step in mastering how to set a digital clock with 3 buttons. Typically, these clocks have three main buttons: Set, Mode, and Adjust. The ‘Set’ button allows you to enter the time-setting mode. The ‘Mode’ button is used to switch between different settings, such as hours, minutes, and sometimes the date. Finally, the ‘Adjust’ button is used to increase or decrease the values. Knowing the primary functions of these buttons will make setting your digital clock a quick and easy process. Follow the instructions below to ensure your watch is set accurately.
Initial Setup
The initial setup for setting a digital clock with 3 buttons is straightforward. After purchasing or resetting your clock, begin by locating the ‘Set’ button. Press and hold the ‘Set’ button until the display starts flashing, indicating that you have entered the time-setting mode. This flashing signal means the watch is ready for adjustments. Use the ‘Mode’ button to navigate to the hour, minutes, or any additional settings your clock may have. Press the ‘Adjust’ button to incrementally set the correct time. Once you’ve set the hour and minutes, press the ‘Set’ button again to save your settings and exit the time-setting mode.
Setting the Hour
To set the hour on a digital clock with 3 buttons, first press the ‘Set’ button to enter the time-setting mode. Use the ‘Mode’ button to navigate to the hour setting. Once the hour starts flashing, press the ‘Adjust’ button to increase the hour. If your watch displays AM and PM, ensure you’re selecting the correct half of the day. Typically, a small indicator on the screen will show AM or PM. Some clocks cycle through a 24-hour format; in this case, ensure you’re adjusting correctly by recognizing that the 13–24 range corresponds to PM hours. Confirm your selection by pressing the ‘Set’ button again.
Setting the Minutes
Setting the minutes on a digital clock with 3 buttons is simple and precise. Once in time-setting mode, use the ‘Set’ button to select the minutes display. Press the ‘Adjust’ button to increment the minutes until you reach the correct time. Each press advances the minutes one by one; holding it down may speed up the process. Precision is crucial, as even a minute off can affect your schedule. Ensuring an accurate minute setting guarantees your clock’s reliability. If your watch features a ‘Mode’ button, it might toggle between hours and minutes, so ensure you’re adjusting the right display. Properly set minutes enhance your clock’s functionality and keep you on track.
Setting the Seconds (if applicable)
Setting the seconds on a digital clock with three buttons can enhance time precision, though not all models offer this feature. To set the seconds, typically, you’ll first press the ‘Set’ button to enter time-setting mode, then use the ‘Mode’ button to navigate to the seconds display. Once there, adjust the seconds using the ‘Adjust’ button. Variations exist among watch models, so refer to your specific user manual for detailed instructions. Some clocks automatically reset seconds to zero when you set the minutes, streamlining the process. The Accurate Seconds setting ensures your clock keeps time precisely, enhancing overall functionality.
Setting the Date and Day (Optional Feature)
Setting the date and day on a digital clock with three buttons is simple if your clock includes this feature. Start by entering the date setting mode using the ‘Mode’ button. Once in the correct mode, use the ‘Adjust’ button to set the month, day, and year accurately. Press the ‘Mode’ button again to switch to the day setting. Adjust the day of the week using the ‘Adjust’ button. Confirm all settings by pressing the ‘Set’ button, which will save your changes and exit the setup mode. Ensuring the date and day are correct helps keep your watch precise and reliable.
Finalizing and Saving Settings
Finalizing and saving the settings on your digital clock with 3 buttons is simple. After setting the correct time, press the ‘Set’ button to confirm and exit the setup mode. Ensure you cycle through all settings until the display stops flashing, indicating the settings are saved. If the settings don’t save correctly, try resetting the watch by holding down the ‘Set’ button for several seconds and repeating the process. Ensure the clock’s battery is functional, as low power can prevent settings from saving. Refer to the user manual for model-specific troubleshooting tips if problems persist. Properly saved settings ensure your clock remains accurate and reliable.
Common Issues and Solutions
Setting a digital clock with three buttons is usually straightforward, but users may encounter common issues along the way. One frequent problem is difficulty distinguishing between the buttons, leading to confusion during setup. To resolve this, familiarize yourself with the buttons’ functions beforehand and refer to the user manual if needed. Another issue is the watch not saving the set time, which can be frustrating. To overcome this, ensure that you press the correct button sequence to save the settings, and consider replacing the clock’s batteries if the issue persists. By understanding these common problems and their solutions, setting your digital clock will be a breeze.
Conclusion
In conclusion, mastering how to set a digital clock with three buttons empowers you to keep accurate time effortlessly. By following the simple steps outlined in this guide, you can efficiently navigate the setup process and ensure your watch displays the correct time, day after day. Understanding the functions of the Set, Mode, and Adjust buttons eliminates confusion and streamlines the setup process. Remember to consult your user manual for specific instructions and additional features. With this knowledge, you can confidently set your digital clock, avoiding common pitfalls and enjoying its reliability. Setting a digital clock with three buttons is a straightforward task that enhances your daily routine, ensuring you stay punctual and organized.