Setting the clock on your Samsung electric range is crucial for maintaining accurate cooking times and schedules. Whether you’ve experienced a power outage or simply need to reset the time, knowing how to set the clock on a Samsung electric range ensures your appliance runs smoothly. This guide provides a step-by-step approach to help you easily configure the time, enhancing your kitchen experience. Stay on track with meal preparations and enjoy the convenience of a well-synchronized range. Follow our expert tips to keep your Samsung electric range’s clock precise and reliable.
How to Set the Clock on a Samsung Electric Range: A Step-by-Step Guide
- Locate the Clock Button: Find the “Clock” button on your Samsung electric range’s control panel.
- Press and Hold: Press and hold the “Clock” button until the display starts blinking.
- Set the hour: Use the “Up/Down” or “+” and “-” buttons to adjust the hour.
- Set the minutes: Press the “Clock” button again, then use the same buttons to adjust the minutes.
- Confirm the Time: Press the “Clock” button one more time to save the settings.
- Verify the Display: Ensure the correct time is displayed and is no longer blinking.
- Troubleshoot if necessary: If the clock does not set correctly, refer to the user manual or reset and repeat the process.
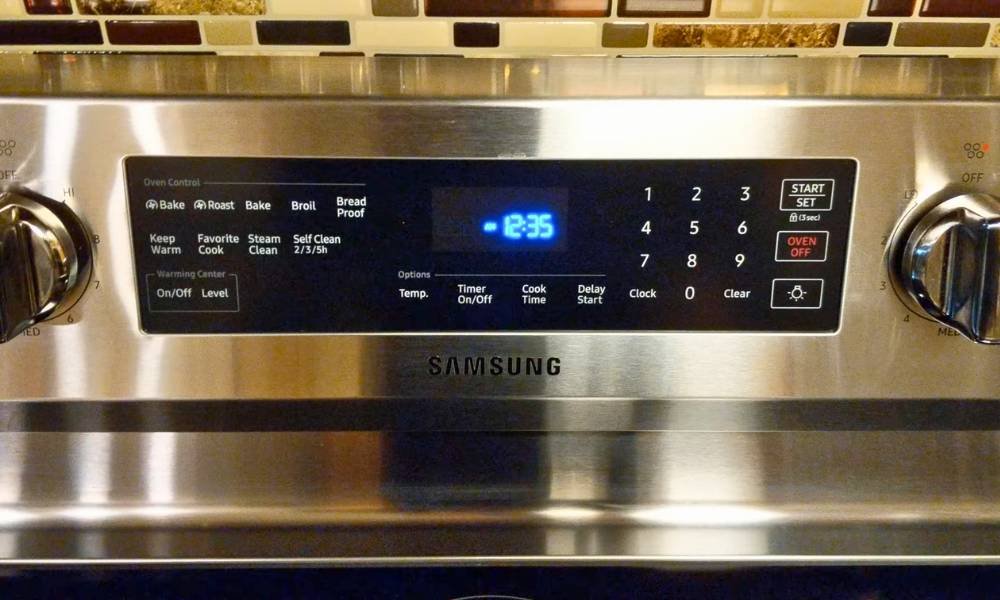
Understanding the Control Panel
To set the clock on a Samsung electric range, start by familiarizing yourself with the control panel layout. Typically located at the front or top of the range, the control panel features several essential buttons. Look for the “Clock” button, which is used to enter the clock-setting mode. You may also see “Settings,” “Up,” and “Down” arrows or “+” and “-” buttons to adjust the time. Knowing the location and function of these buttons simplifies the process of setting your range’s clock, ensuring you can quickly and accurately update the time whenever needed.
Initial Preparations
Before setting the clock on your Samsung electric range, ensure it is properly connected to a power source. Double-check that the range is plugged in and receiving electricity. Next, prioritize safety by making sure the control panel is clean and dry to prevent any malfunctions or hazards. Avoid using wet hands when interacting with the control panel. If the range has recently been used, allow it to cool down to prevent burns. Taking these initial preparations will help you set the clock accurately and safely, ensuring your range operates smoothly and efficiently.
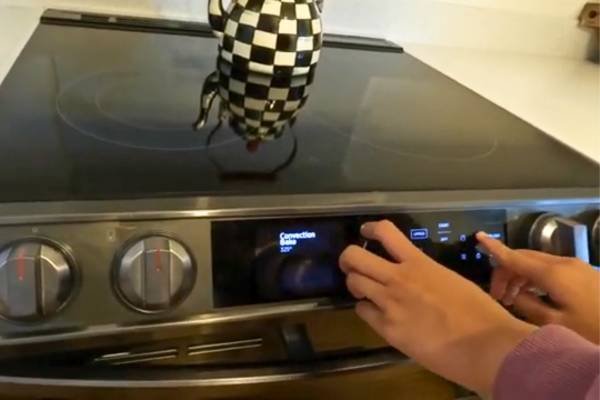
Accessing the Clock Setting Mode
Accessing the clock setting mode on your Samsung electric range is simple with these steps. Begin by locating the “Clock” button on the control panel. Press and hold the “Clock” button until the display starts blinking. This indicates that the watch setting mode is active. You’ll see the hour digits flashing, ready for adjustment. Use the “Up/Down” or “+” and “-” buttons to set the correct hour. Press the “Clock” button again to move to the minutes. Adjust the minutes using the same buttons. Once set, press the “Clock” button once more to confirm and exit the setting mode. Your display should now show the correct time, no longer blinking.
Setting the Time
Setting the time on your Samsung electric range is simple with this detailed guide. First, press and hold the “Clock” button until the display blinks. Use the “Up/Down” or “+” and “-” buttons to set the correct hour. Press the “Clock” button again to switch to minute adjustments, and use the same buttons to set the minutes. Press the “Clock” button one final time to confirm the time. Ensure the display shows the correct time without blinking. If needed, consult the user manual for additional guidance. These steps ensure your range’s watch is accurate, enhancing your cooking experience.
Confirming the Time
To save and confirm the newly set time on your Samsung electric range, press the “Clock” button one final time after adjusting the hours and minutes. This action locks in your settings. You will notice the display stop blinking, indicating that the time has been successfully saved. The watch should now show the correct time continuously, without flashing. If the display reverts to its previous state or continues blinking, repeat the process to ensure the settings are properly saved. A stable, non-blinking display confirms that your Samsung electric range’s clock is accurately set and ready for use.
Troubleshooting Common Issues
When setting the clock on your Samsung electric range, you might encounter some common issues. If the watch does not respond or displays the incorrect time, first ensure the range is properly connected to a power source. Double-check that you’re pressing the correct buttons and following the steps accurately. If the display is still unresponsive, try resetting the range by unplugging it for a few minutes and then plugging it back in. For persistent issues, consult the user manual or contact Samsung support for further assistance. Regular maintenance and occasional resets can help keep your range’s clock functioning correctly.
Resetting the Clock After Power Interruptions
After a power interruption, resetting the clock on your Samsung electric range is essential to ensure accurate cooking times. This step is necessary because power outages can cause the watch to reset to 12:00 or display the wrong time, affecting meal preparation. To quickly reset the clock, first ensure your range is plugged in and powered. Press the “Clock” button on the control panel until the display starts blinking. Use the “Up/Down” or “+” and “-” buttons to set the correct hour and minutes. Press “Clock” again to confirm. This simple procedure restores accurate time, keeping your cooking schedule on track.
Maintaining Accurate Time

To maintain accurate time on your Samsung electric range, it’s essential to perform periodic checks and adjustments. Regularly verify the clock’s accuracy, especially after power outages or significant temperature fluctuations. If you notice any discrepancies, promptly adjust the time using the control panel. Additionally, keep your range’s manual handy for reference, as it provides specific guidelines for time settings and troubleshooting. By consistently monitoring and adjusting the watch, you ensure that your cooking schedules remain reliable and accurate. This proactive approach not only enhances your cooking efficiency but also extends the life of your appliance by preventing potential time-related issues.
FAQs for Setting the Clock on a Samsung Electric Range
1. How do I access the clock setting mode?
✅Press and hold the “Clock” button until the display blinks, then adjust the time.
2. What if the clock display isn’t responding?
✅Check the power connection, then unplug the range for a few minutes and try again.
3. Can I use a 24-hour format?
✅Most models use a 12-hour format. Check the manual for 24-hour format instructions.
4. Why reset the clock after a power outage?
✅Power outages reset the watch settings, so you need to adjust them for accurate timekeeping.
5. How often should I check the clock’s accuracy?
✅Periodically check the clock, especially after power outages or temperature changes, to ensure it’s accurate.
Conclusion
In conclusion, knowing how to set the clock on a Samsung electric range is essential for maintaining accurate cooking times and ensuring your kitchen runs smoothly. By following the simple steps outlined in this guide, you can easily set and adjust the clock as needed. Regularly checking and updating the clock helps prevent discrepancies, especially after power outages or temperature changes. This proactive approach keeps your appliance functioning optimally and enhances your overall cooking experience. Remember, a correctly set watch not only ensures precise cooking times but also extends the life of your range by preventing potential time-related issues. Keep your kitchen on schedule with a well-set clock.